
When you add or remove text in Microsoft Word, images automatically move around. Regrettably, the frequent movement of the graphics can cause the Word file’s layout to shift. To address this issue, Microsoft Word allows you to lock images in a specific spot.
By locking the image, you ensure that it stays in the same place regardless of what else is changed in the Word page. The following are some options:
HOW TO USE THE RESTRICT EDITING FEATURE IN MICROSOFT WORD TO LOCK AN IMAGE
Users can encrypt an image with a password by using the restrict editing option. Using this feature, however, also locks the document’s other contents. As a result, this method is only recommended when the Word document is shared with third parties and no changes are desired.
- First, open Microsoft Word on your computer.
- Next, click the Insert button on the Ribbon tab.
- Then go to Pictures and select Insert Picture From Your Computer, Online, or Stock Images.
- Once your image has been added to the document, select the Review tab.
- Select Protect, followed by Restrict Editing. This opens a side panel on the document.
- Tick one or more of the following boxes (image below) from the side panel.

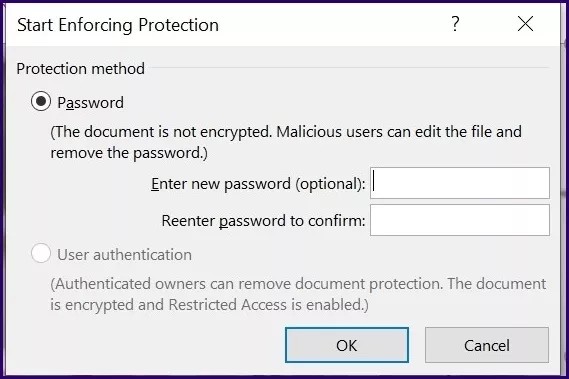
- To open a dialog box, select Yes, Start Enforcing Protection at the bottom of the menu.
- Provide a password for the document in the dialog box and click OK to save your changes.
USE THE WATERMARK FEATURE IN MICROSOFT WORD TO LOCK AN IMAGE
This option may be preferable if you have an image set as your background in Word because it keeps the image in place.
- First, open Microsoft Word on your computer.
- On the Ribbon, click Design.
- Choose Watermark from the available options.
- Choose Custom Watermark.
- In the next dialog box, select Picture Watermark, then click Select Picture.
- Select Insert Picture from your preferred source from the new pop-up menu (File, Bing or OneDrive).
- Select OK to save the changes, and the image should appear in your document as a locked background.
HOW TO USE MICROSOFT WORD’S POSITION ANCHOR TOOL TO LOCK AN IMAGE
The Picture Anchor tool maintains the position of an image in a Word document. This is how it works:
- On your computer, open Microsoft Word.
- Select Insert from the Ribbon tab.
- Select Pictures and then Insert Image from your computer, online, or stock images.
- Once you’ve uploaded your image to the document, you’ll see a menu appear when you right-click on it.
- In Step 5, choose any of the text wrapping styles except In Line with Text, which is the default setting for all imported photos, and then click Wrap Text.
- At this point, a semi-circle should appear around the image you selected.
- Select the semi-circle and check the box next to Fix Position on Page to ensure that your image remains in its original position.
HOW TO USE THE DEVELOPER TAB’S PICTURE CONTENT CONTROL TOOL TO LOCK AN IMAGE
Versions of Microsoft Word 2010 through 2019 include a Developer tab. Word for Microsoft 365 users can access it as well. To secure an image, use the following steps to gain access to its picture content control feature:
- Start Microsoft Word on your computer and type in a name for your document.
- Right-click on the Ribbon with your mouse.
- To open a dialogue box, click on Customize Ribbon.
- In the Main Tabs menu, tick the box next to Developer so that you can access it from the Word Ribbon.
- Close the dialogue box by clicking OK.
- In Word’s Ribbon, go to the Developer tab.
BE AWARE: Before going to the Developer Tab, make sure the image you want to lock is selected.
- Picture Content Control (shown by an image symbol) will lock your image when you complete this step.
MAKE ALL OF YOUR PICTURES THE SAME SIZE IN MICROSOFT WORD
Your Microsoft Word document will remain orderly if the graphics in the document are locked. Another technique to keep the images in your Word document structured is to make sure that they are the same size across the board.