I personally use Windows 10 and if there is one thing that will drive you crazy, can’t be none other than autocorrect. Windows 10 autocorrect problems are really irritating, hence I found it worthy to write about it, helping my fellow mates also using Windows 10. Use this guide to fix Windows 10 autocorrect problems that are ruining what you type today.
Of all the Windows 10 problems you can have, autocorrect problems are the most frustrating. That’s because they happen hundreds of times a day and, unlike other issues Windows 10 users face, autocorrect problems impact the way you communicate. With autocorrect problems, expect to send an email only to realize later that Windows 10 replaced what you wrote with something you didn’t. Autocorrect problems also make typing your friends’ name a hassle and break mentions on Twitter and Facebook.

Windows 10 autocorrect problems also make Windows 10 harder to use when you aren’t writing or typing something. Searching for an app becomes problematic because autocorrect may change what you typed just before you click the search button. If Windows 10 is already improperly correcting your messages, this can happen.
Here’s how to fix Windows 10 autocorrect problems and stop your notebook, desktop or tablet from creating mistakes in your emails, messages and posts that aren’t there.
How to Add Words to Windows 10’s Dictionary
The easiest way to fix Windows 10 autocorrect problems is to add problematic words to your dictionary. For whatever reason, there’s no easy way to do that from the Settings app. However, you can add words to Windows 10’s dictionary by editing a text file buried in the operating system.
Open any File Explorer window with an address bar, like the Documents folder.

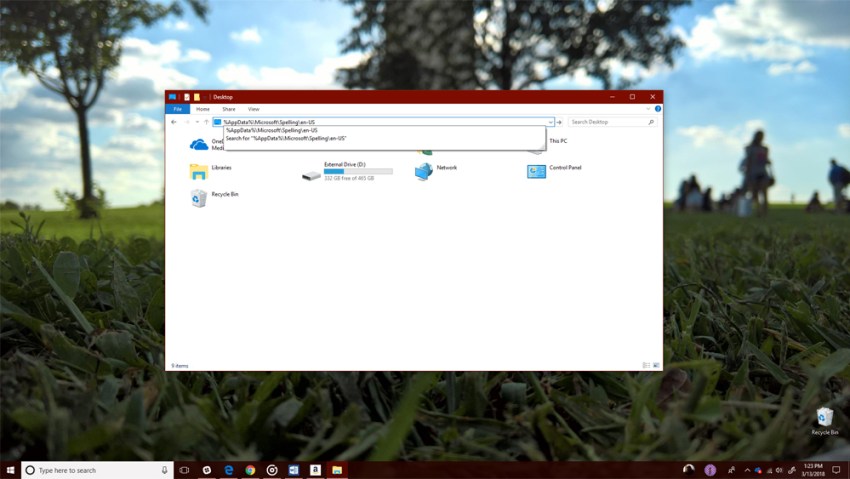
Copy and paste the following text into the address bar in that File Explorer window by right-clicking on it.
%AppData%\Microsoft\Spelling
Hit enter on your keyboard.

Open the en-us folder. Note that the name of this folder depends on your default language. For this tutorial, we’re editing the English United States keyboard, which is why our example has the en-us folder.

Now, right-click on default.dic file.

Select Open With.

Choose Notepad from the list of apps you can open the file with. If Notepad doesn’t appear as an option, click on the More apps text at the bottom of the pop-up and find it in the list. Don’t open this file with anything else but Notepad. Click Ok.

Click below the first word and add the word that you would like Windows 10 autocorrect to stop changing. We added “AppData” to the dictionary for this tutorial. Every word you add to this file needs its own line.

Click File at the top of Notepad. Then click Save.

From this point on, Windows 10 will not attempt to autocorrect anything you added to the dictionary file. This change won’t sync to other Windows 10 PCs, unfortunately.
How to Turn Off Windows 10 Autocorrect
If you don’t like autocorrect and you’d just like disable it all together, turn off Windows 10 autocorrect from the Settings app. Despite not letting you easily add words to the dictionary, Microsoft makes this very easy to do.
Press the Start key on your keyboard or click the Start button in the bottom-left corner of your PC.

Click the Settings cog along the left edge of the Start Menu or Start Screen.

Click Devices in the Settings app.

Click on Typing in the menu on the left side of the Settings app.

Flip the Autocorrect Misspelled Words switch to off. Windows will stop correcting anything that you type. Flip the Highlight Misspelled Words switch to off and the operating system will stop Windows 10 from highlighting words it thinks you misspelled.

If you leave both features off, proofread everything that you type. Built-in apps and apps you downloaded from the Microsoft Store depend on Windows 10 autocorrect to let you know when you’ve mistyped something. For example, the free Office Mobile apps won’t autocorrect misspelled words without this feature on, even though Office 2016 apps will because they have their own dictionary.
Install Grammarly and other Microsoft Edge extensions to let you know when you’ve misspelled something or a web app you visit often.
How to Turn Off Windows 10 Autocorrect on Keyboards
For years, Windows 10 autocorrect would only correct what you typed on a touchscreen, but that’s changing soon. The Windows 10 Spring Creators Update adds autocorrect for hardware keyboards. If you just installed this update and don’t like the feature, here’s how to turn it off.
Click on the Start icon in the bottom-left corner of your screen.

Click on the Settings cog along the left edge of the Start menu.

Click on Devices.

Now, click on Typing in the menu on the right-side of your screen.

Scroll to the bottom of the list and flip all the switches under Hardware keyboard to off. This will stop Windows 10 from suggesting words as you type and turn off Windows 10 autocorrect for your keyboard. Return here to turn the feature back on if you ever decide you want to use it.


